OUTLINE TEMPLATING

There are 4 basic ways to make a surfboard outline template:
- Download and print a Greenlight Outline Template
- Trace an existing board outline
- Design and print your outline in AKUShaper software
- Batten “old school” templates
OR
Skip the whole outline templating, cutting, and squaring process by designing your own custom close tolerance surfboard blank in AKUShaper software and we'll manufacture your blank exactly to your design. All you have to do is shape the bottom contours and rails resulting in less work, less dust, and a better board as the end result...
The first thing you need to do is determine which method you will use to make a template. If you are satisfied with any one of Greenlight’s pre-designed shapes (58 available at last count), then you get to skip the design-stage and go straight into making your template.
If you have an existing board that you want to try to copy, simply trace the outline of an existing board that you want to try to copy.
If you want to create your own design from scratch, you have two basic choices: AKUShaper Software or the “old school” batten method. For the AKUShaper method, you need internet access, a computer, and a printer. For the batten method, you need a long, thin flexible “batten” to define your curve, and some small nails/hammer to temporarily secure the batten on the Masonite to define the outline curve you want.
Both methods work well and are pretty easy. The AKUShaper method allows you to “fiddle” with the shape more easily on the computer screen to arrive at your final design. It also has the added benefit of calculating volume, allowing you to design the rocker and rails, and to view the board in 3D.
The biggest benefit of the batten method is that it allows you to visualize the shape in full size as you are creating it. With the batten method, you should be sure of your nose, tail, and wide-point widths before you start, because these points will be defined when you start, and it is a bit of a pain to change these dimensions/locations as you go.
If we had to choose, we would choose the AKUShaper method due to the increased flexibility in design and the ability to determine rocker, thickness, and volume - and you can just send us your design to customize your blank.
TEMPLATE-MAKING PROCESS
(Skip this step if you're shaping a custom close tolerance EPS Blank)
All of the four template making techniques will get you to the same point: a curved line drawn on a piece of hardboard. You can get 8’x4’x1/8” sheets of Masonite or hard plastic wall covering from any home center. You should also get the home center to cut the Masonite in 4 1’x8’ slices, which gives you four straight-edge pieces to make 4 templates. They usually do this for free.
If your board is over 8’ long and you need to make a two-sided “spin” or “flip” template, you simply draw the nose half of the board on one side of the template, and the tail half of the board on the other side. Just make sure that you mark “stringer” points on both ends and top/bottom of the template to mark the point where you will place the template down on the stringer when you trace your outline on the surfboard blank.
If you are making a swallow tail, you do not need to include the swallow tail on the template. Just carry your template out to the end of the rail line and square off the tail of the template. You add the swallow tail later in the shaping process when the board is almost completely shaped.
Once you get that curve drawn on the Masonite, the directions to cut and smooth out your template are all the same. But first, we will outline the various methods of getting curve drawn on the Masonite:
1. GREENLIGHT TEMPLATES
Once you have chosen your design, print out all of the template components and cut the sections out. Tape them together using the markings that are printed on each sheet for proper alignment. Once the curve pieces are taped together, you can tape down the paper template (or use spray adhesive if you want), making sure the endpoints of the nose and tail are flush with the flat-side of the Masonite. Once the paper template is securely fastened to the Masonite, trace the outline curve with a Sharpie Marker, being careful not to let the paper move or distort as you trace.
2. TRACING AN EXISTING BOARD
If you are going to make a template from an existing board, the fastest, most accurate method is to clamp your Masonite template board directly to the bottom of the board you are copying. Make sure the flat edge of the Masonite is centered on the stringer, and make sure your clamps are padded enough so that they don’t put pressure dings in the board. Once the Masonite is secure, trace the outline with a Sharpie onto the masonite. Be extra careful to hold the marker vertical as you trace to that you get an accurate transfer of the outline.
3. AKUShaper TEMPLATES
Transferring your CAD-designed template to Masonite is exactly the same as making them with the Greenlight Templates. From the software, you print the template in full size on multiple sheets of 8 ½” x 11”paper. Then you tape all of the sections together and cut out the curve on the full sized paper template. It is better to cut OUTSIDE the line than INSIDE. Try to get as close to the line as possible. Once the curve is cut out, you can tape down the paper template (or use 3M Super 77 spray adhesive if you want), making sure the endpoints of the nose and tail are flush with the flat-side of the Masonite. Once the paper template is securely fastened to the Masonite, trace the outline curve with a Sharpie Marker, being careful not to let the paper move or distort as you trace.
4. BATTEN TEMPLATES
To make a template using a batten (long, flexible, thin piece of wood or other hard material), you first need to mark 5 points along the straight edge of your Masonite:
- Nose
- 12” from Nose
- Midpoint
- 12” from Tail
- Tail
Once you have marked these points, you need to measure and mark the proper widths of your design at each of these points. Use a G-square to mark each point and hammer a nail into the Masonite slightly inside each of these points. Hammer two nails at the nose/tail marks to hold the batten in place. The nails act as guide-points for the batten. When you place the batten around the nails (secured by the double nails at the nose/tail), you now have a curve as a starting point. From here, you can place additional nails wherever you want to nudge the batten around and modify the curve to your liking. Once the batten is curved the way you like it, trace the outline with a Sharpie (or pencil) and remove the batten and nails to prepare for cutting the outline.
CUTTING AND FINISHING YOUR TEMPLATE
Once you have your template traced out on Masonite, you need to cut it out with a Jig Saw and preferably carbide-tipped jigsaw blade. Don’t forget the eye protection and dusk mask, and once again, STAY OUTSIDE THE LINE when you cut. Give yourself a 1/8” or so buffer as you cut out the template. It’s best to have a friend holding the Masonite as you cut, or at least clamp the Masonite securely to a table/work-bench to keep it stable as you cut. You may have to move/relocate the clamps as you go to complete the cut.
With the template rough-cut, now it’s time to smooth it out to final shape. First you must clamp down the template onto a table or workbench securely. Now, take your trim plane and use it to take down all of the high-spots on your cut. Make sure you don’t shave below the line. Try to get to the line but no further with the trim plane. In this stage, you are trying to take out any dips or lumps in the curve. Don’t let the Sharpie/Pencil line distract you, it is better just to look at the curve itself to try to discover any dips/bumps that need to be smoothed out with the trim plane. Let your eyes be the judge of the curve, not the line. Flip the template over to hide the line if it helps.
Once you have trimmed the template down to the line and have a nice, smooth curve, switch to a hard sanding block with medium grit sandpaper (60-80 grit) and run this along the curve to sand away any burrs and roughness created by the trim plane. You should also slightly bevel the edges of the Masonite with the sanding block to smooth it out and prevent fraying of the edges. Again, the goal here is to have a nice, smooth curve without dips. The smoother your template, the better chances you have of building a good surfboard.
Once your template is complete, take a minute to measure the nose (12” from nose), wide-point, and tail (12” from tail) widths and write these down with a Sharpie on the template (along with the date and any other pertinent info). You may also want to drill a ½”-1" hole somewhere near the top/bottom of the template (not too close to the edge), so you can hang up the template on a peg/hook in your workshop when it’s not in use.
HOW TO CUT A SURFBOARD OUTLINE
(Skip this step if you're shaping a custom close tolerance EPS Blank)
Tracing the outline on the blank is where all of your hard work making a template gets put to use. Too bad this step is over in an instant. You always trace the outline of your board on the bottom of the surfboard blank. Line up the straight edge (or stringer points if you are using a spin template) of your template along the center of the stringer, and adjust the exact location of the template fore-aft on the blank to line up with the intended rocker that you want. Remember that the blank is longer than your template, so sliding the template forward on the blank will give you more nose rocker, and sliding it backward toward the tail will give you less nose rocker and more tail rocker.
Once your template is lined up in the right place, simply hold it down flat on the blank and trace the outline onto the foam using a Shaper's Pencil. Then you flip over the template, center it on the stringer and fore/aft, and trace the other side of the board. Make sure you have the same fore/aft location on both sides to insure symmetry of your outline.
CUTTING THE OUTLINE
(Skip this step if you're shaping a custom close tolerance EPS Blank)

Once your outline is traced on the bottom of your blank, you need to cut it out with a hand saw.
Cutting the outline on your blank is similar to cutting out your template: STAY OUTSIDE THE LINE by at least 1/8” inch to give yourself some room for error. Cutting inside the line gives you a dip in the outline that cannot be fixed unless you change (narrow) the dimensions of your shape. Try to avoid this.
One final tip in cutting your outline is to keep the sawblade as square as possible (90 degrees). You can clean this up later in the process, but the more vertical your outline cut, the easier it will be to get a good, clean shape.
SQUARING UP AND SMOOTHING
THE OUTLINE CUT
(Skip this step if you're shaping a custom close tolerance EPS Blank)

Once your outline is cut, you need to perform one of the most important, yet underappreciated tasks of shaping: squaring the outline cut. If you can have a nice 90 degree vertical rail for the full length of the outline, your rails and board will turn out much better.
The easiest way to square up your outline rails is to use a Rail Runner Tool to clean up and remove material from the rail, or you can also use a G-rasp or a hard sanding block and sandpaper and keep it flat along the outline.
You can place the blank either flat on the shaping racks (with your shapers weight holding it down) or sideways in the saddle with the rail facing up. Start with the Rail Runner Tool to shave away all of the high spots from your cut. Now is the time to carefully hone in on the line you traced on the blank. The Rail Runner will automatically shape that flat, 90 degree rail outline.
The goal here is simply to clean up and smooth out the outline as much as possible, getting rid of hills and valleys in the outline, and erase the traced line. You want to end up with a nice, smooth outline curve, so take some time to step back and look down the full length of the rail to identify if there are any unwanted dips in the outline - and feel them with your hands. Another trick to ensuring your outline is bump-free, use the hard handing block without sandpaper and run it along the rail. You'll feel any wobbles through the block that your eyes can't see. But if you use a Rail Runner Tool you can be sure the rail is perfectly perpendicular to the deck and bottom.
Once you are satisfied that the outline cut is “true” and square, take a final sanding pass with a hard sanding block and 80 grit sandpaper, making sure you have sanded away the outline mark and that the outline cut is smooth, bump-free, and square. Again, don’t be a slave to the outline mark. It is better to trust your eyes and look at the entire curve to ensure it is smooth. If you do a good job in this step, you stand a much better chance of turning out a good looking surfboard. We can’t stress this enough. Any wobbles in the outline now will show up in the final product!
BRINGING THE BLANK TO THICKNESS
(Skip this step if you're shaping a custom close tolerance EPS Blank)
Whenever we put a rasp or sandpaper to foam we make the board thinner so we always shape a blank that is at least 1/4" thicker than our final board thickness to allow for shaping adjustments. In this step we'll reduce the board thickness to around 1/8" thicker than the final shape thickness. This extra 1/8" of foam will be removed quickly when blending the rails into the deck and fine tuning the shape...
Please make sure if you are planning to shape a single concave in the bottom to account for that removal of foam in this step. Surfboard thickness is measured around the midpoint of the blank with calipers and the concave affects that thickness measurement. If you're putting in a 1/8" deep concave later in the shaping process, make sure your blank ends up around 1/4" thicker at the end of this process. You'll remove that 1/8" of foam while shaping the concave in the bottom and another 1/8" when blending the rails into the deck and fine tuning your shape.
Start on the stringer with the trim plane. Since wood shapes differently than foam, it's easiest to shape the stringer down first and then shape the foam down to the stringer with a 24" Rasputin Rasp Tool. The stringer will act as a hard stop and you'll know the curve is smooth and even from rail to rail.

Run the trim plane along the stringer and dig the blade into the wood. There should be a nice thin wood curl roll out of the trim plane. Usually you'll come across a change in direction of the wood grain somewhere along the stinger. You'll know it when the blade digs in and you can't plane any more. Simply go in the opposite direction now.
Check your progress by measuring the thickness of the stringer with the calipers or put a straight edge (bubble level) across the board and measure down to see how much you've shaved off. Continue the process and stop when you get to your thickness goal (remember it's 1/8" - 1/4" thicker than you final board thickness).

Now take your 24" Rasputin Rasp Tool and scrub the foam using long strokes to shape the foam down to the stringer. Stand at the tail and pull the rasp toward you for the most efficient foam cutting, same for the nose. Stand on the side of the board to get the middle section down. When the foam is flush with the stringer from nose to tail you're done with the thickness adjustment.
HOW TO SHAPE A SURFBOARD ROCKER and FOIL
(Skip this step if you're shaping a custom close tolerance EPS Blank)
First, let's go back to tracing your outline template on the blank. Like we mentioned before, it's a good idea to push the template towards the nose or tail to get the rocker dimension really close to one of those rockers so there is less shaping. Normally you'll use the nose rocker in the blank and push the template to where the nose curve matches your desired nose rocker. Then you'll just shape in more tail rocker. Of course you can always do the opposite and use the blank's natural tail rocker curve and adjust the nose rocker. It's up to you and your design. You can use the rocker stick and method described below to find the rocker number and put a pencil mark on the stinger to line your template up with.
Now, with your nose and tail rocker measurements handy, your first task is to make some pencil marks on your blank to act as guide points to hit as you are shaping your rocker.
You will need a Tape Measure and a “Rocker Stick” to identify and mark the key points on the blank. A Rocker Stick is simply a long, straight stick placed along the stringer of the board to measure the nose and tail distances of the rocker from the lowest point of the bottom curve. Shapers typically use angle iron or square aluminum sticks that are cheap and easy to find at home centers but you can also use 1 x 4, 2 x 3, or 2 x 4 lumber. Find one that is at least as long as the board you plan to make. You can use any long stick to measure rocker, as long as it is straight and not too heavy so that it will bend the blank when placed on the stringer.

To keep the rocker curve nice and flowing we'll shape the stinger with the trim plane. Flat and square tools like a trim plane are good for trimming things flat but not making curves! So we approach making curves with what we call the "stair step method".

The stair step method goes like this: take the trim plane and we'll start approximately 3” away from the tail (or the nose if you're adjusting nose rocker) and we're going to cut the stringer down from that point all the way off the tail in one pass. Then we're going to “step up” toward the center of the blank about 6” inches from the tail and then we'll cut start cutting from there off the tail. Then we'll move back 9”, 12”, 15”, 18” however far you want to go up the blank depending on your design. Every time we use this method to cut the stringer all the way off the tail from multiple points stepping up toward the middle of the board we're going to create a nice smooth continuous curve for our rocker. You want to repeat this stair stepping cut method as many times as you need to to achieve your rocker to the point where you're marked on the end of the stringer.
Now we'll use the 24" Rasputin tool again just like we did to get the thickness down and just scrub the blank down to the stringer.
A final note on marking your blank: don’t get overly caught up in the numbers! Water flow doesn't care about numbers, only curves. It’s OK if the blank does not allow you to get your exact rocker and thickness profile. It is more important to have smooth, continuous curves in your rocker than to try to “manipulate” the blank into fitting your exact thickness and rocker numbers.
You can also use a power planer to foil your blank but it's not recommended for your first few boards as we discussed in the tool section of this building guide. If you want to use a power planer we recommend checking out our advanced Masterclass videos which show proper power planing techniques so you don't screw it up.
FOILING THE DECK
With your bottom rocker shaped and smoothed, the final step in foiling your blank is removing some foam from the deck. Foil is the distribution of foam from the nose to the tail. We want a relatively thin nose flowing gradually into the thickest part of the blank (under our chest and belly when paddling) and smoothly tapering to a thin tail.
This process is similar to foiling the bottom, but you should be really focusing on the tips of the nose and tail as you've already brought the blank down to thickness in the middle and have a natural foil from the blank's design.
Once your final thickness points are marked on the stringer of the nose and tail, you follow the same procedure as the bottom with the trim plane and 24" Rasputin Tool to remove material from the deck down to your desired thickness. However, you will find it is very difficult to effectively plane the stringer in the nose area of the deck because of the upward curve of the blank. In this area, simply rotate the trim plane about 45 degrees to the stringer and you'll be able to get the tool into the curve. You'll remove less wood at an angle like this but it'll get the job done.
At this stage in the game your blank should have a smooth, flat bottom with the correct rocker, smooth vertical rails, and a smooth, flat deck.
HOW TO SHAPE CONCAVE AND VEE INTO A SURFBOARD BOTTOM
CUTTING CONCAVES
DESIGN: Other design elements have an effect on the shape, length, and depth concaves, particularly board rocker, thickness, and the kinds of waves the board is intended for. Once these factors have been determined, the shaper then decides on the general length and depth of concaves to use, and how multiple concaves will interact and influence the flow of water along and across the bottom of the board. (See Design Notes on Bottom Contours)
Basically you're making a spoon shape in the bottom of the board. If you can envision that shape of a spoon then shaping concaves will be easy for you.

MAP OUT:
Measure and mark where your concaves will begin, end and reach their maximum depth. Light pencil marks on the stringer should mark where your concaves begin and end; and sketching the perimeter of the "spoon shape" will help novice board builders cut concaves with symmetry and accuracy.
Single Concaves:
All you need is a trim plane and G-rasp. Single concaves can also be roughed out using an electric planer but as we mentioned before stay away from power tools when you start your board building journey.
Starting at the center of your concave (where it is deepest) take small passes with the trim plane and gradually work your way out to the ends along the stringer with longer passes. Keep in mind you'll want to go in one direction and follow the stringer wood's grain. By digging out the center with multiple passes you'll see the concave take shape on the stringer with the deepest point in the middle fading out to shallow at the ends of your concave... kind of like the "stairstep method" when adjusting rocker but in the middle of the board going in two directions.

Once the stringer concave is set you can use a hard block and paper or a G-rasp to shape out the foam from the stringer outward to the edges of your concaves. Apply more pressure to the G-rasp in the deepest part of the concave and gradually less as you shape the edges of the concave spoon shape. You can also "scoop" the foam from the stringer out to the perimeter of the concave by rolling the tool up and using the edge of the G-rasp. You are sculpting foam at this point... the goal is to make a rough spoon shape. Be careful to avoid digging too deep into the foam next to the stringer. You want the stringer to be the lowest part of the concave. If you do dig too deep just use the trim plane to bring the stringer down again.

You'll want to occasionally check the depth and symmetry of your concave while roughing it out. Use your straight edge or 24" bubble level and lay it across the board to see concave shape at that point. Drag the straight edge from nose to tail to check the entire concave profile. You'll probably see one side is not as deep as the other in some areas so take care of that and check again until it's all fairly close. No need to get it perfect and don't over work the concave.
FINISHING: Once your concave profile is roughed out with the G-rasp, you may proceed with the the padded side of the hard/soft block and Tigershark Sandpaper to smooth out the concave.
Double Concaves:
In boards with single-to-double concaved bottoms, the double concaves are shaped into the single. As is the case with single concaves, determining the length and depth of the concave is part of the design process, and up to the shaper. The process for shaping double concaves is similar to shaping singles, the difference being you don't touch the stringer... The double concaves are mapped out with light pencil marks on both sides of the stringer and normally starting at the deepest part of the single concave.

The double concaves can stop anywhere near the tail, say 3" and create that spoon shape for lift, or continue all the way out of the tail to direct water flow for speed.
To shape double concaves use the G-rasp and scrub the deepest part then follow up with the scooping method using the edge of the G-rasp and rolling it up along the sides of the concave to make a "U" shape from the stringer to the outer edge of the concave.

Once again, check the depth and symmetry of your double concave with the straight edge and even them out.

FINISHING: Same as the single concave, use the padded side of the hard/soft block with Tigershark Sandpaper and blend the contours smooth.
HOW TO SHAPE SURFBOARD RAILS
Shaping the rails can appear to be the most confusing step for a beginner shaper, but if you’ve done a good job smoothing and truing your outline, shaping nice rails is actually relatively easy. Rails are shaped with multiple angular cuts called “rail bands” or "rail bevels". These rail bands are measured and laid out to determine the shape and volume of your rails. They are shaped with a G-rasp or power planer (not recommended in the beginning) to create flat planes which are then rounded off with SandShark Rail Screen for a smooth, hydrodynamic shape. There are typically two or three rail bands shaped on the deck and one rail band on the bottom, called the "tuck" (like tucking your bed sheets), that determine the rail shape. See the illustration below:

Before you start making these cuts, you need to determine what type of rail profile you want in your board.
First, determine if you want a flat deck or domed deck as this will affect your overall rail shape and volume. Generally surfboards with flat decks will have more volume from the center line of the board extending into the rails make the rails "fuller" and more rounded. Domed decks will have less volume and a more pinched rail that will sink deeper into the wave for more control in steeper waves.

Note: EPS foam is more buoyant than Polyurethane foam (technically we call it buoyant acceleration) so it is wise to either shape EPS blanks with a flat deck 1/8" - 1/4" thinner than you would normally ride in PU foam and/or dome the deck to keep the rail volume lower while maintaining volume in your chest area for paddling... you don't want a really beefy rail that will not sink into the wave enough, you'll end up sliding down the face of the wave as a fat rail will push away from the water and not let it wrap around for control. Read our Surfboard Design Guide for more info.
Now that you have determined whether you'll be shaping a flat or domed deck, you need to determine what type of rail profile you want in your board.
There are many rail shapes you can design for your board. Knifey, Boxy, Eggy, 50/50, Full soft, Pinched, etc... the list goes on and on... Greenlight's goal is for you to be successful and make yourself a solid, fun-to-ride surfboard so we've shaped and tested dozens of rail shapes over the years to determine the best rail shape to start with. So we recommend shaping what we call a "Medium Modern Rail" with either a flat deck or domed... You can't go wrong with this rail shape regardless of the type of board you're making whether it's a fish, mid length, longboard, or high performance shape. This rail shape works well in all conditions and is a great starting point for your own understanding of board design and future customization to fit your surfing style and progression.
Here are simplified rail band dimension charts for the Medium Modern Rail with Flat or Domed Decks.
FLAT DECK

DOMED DECK

The rail band charts above are new to this guide as we continue to develop better, simpler ways to make your own surfboards. You'll see at the bottom of these charts "Greenlight's 75% Formula" for rail band dimensions at 12" from the nose and 12" from the tail. This 75% Formula is explained in detail in our MASTERCLASS Video Series. These measurements have always been elusive for shapers as it's typically been a "measure-by-eye" thing which has resulted in way too many messed up rails by novice shapers. We are very proud and excited to have solved this problem for you through experience and statistical analytics so you do it right!
Before moving on here are older rail band charts we have had in this guide for years. The two basic kinds of rails: higher volume “boxy” rails and lower volume “knifey” rails. You should take a look at these too for a complete understanding of how rail bands work and how the dimensions affect the shape.

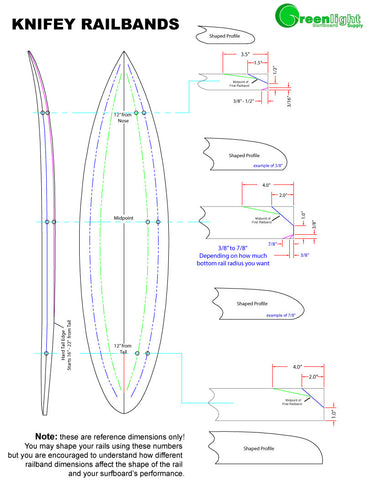
Basically, boxy rails have more volume and therefore more buoyancy/resistance when engaged into a wave face. Knifey rails have less volume and therefore penetrate the wave face easier. Knifey rails are used for higher performance shortboards where rail-penetration is desired, and boxy rails are used for longboards and less performance-oriented boards where flotation and stability are the desired characteristics.
MARKING RAIL BAND GUIDE POINTS
Use a tape measure to mark the appropriate rail band points on the rails for both deck rail bands and bottom tuck. Some people draw lines to connect these dots to create guidelines for a more visual approach to shaping. Up to you but scribing lines is not really necessary, just shape until you hit the dots laid out on the blank. As in many other steps of shaping, it is better to trust your eyes, step back from what you are doing, and try to get your rail bands cut as smoothly as possible by eye. The rail band marks on the deck and rails at a few key points along the length of the board should be enough to guide you through the process.
One final note on marking rail bands: For the most part, the vertical surface that remains along the outside of the rail once the tuck is shaped and primary band is cut, determines the overall volume of the rail. It is important that this “band,” which will become the rail apex once the rail is finish shaped, is widest at the widepoint, and tapers smoothly toward the nose and tail. This taper will determine the “foil” of the rail – how the volume of the rail flows from nose to tail.
SHAPING THE BOTTOM RAIL BAND
Most shapers begin with the smaller rail band on the bottom of the board. Besides old-school longboards, most boards have a sharp bottom edge running from the tail to about 16-20 inches up from the tail. This sharp edge then slowly tapers into a rounded bottom rail through the nose area. Some shapers shape the bottom rail band with a Greenlight's Rail Runner Tool for ease of accuracy. You can also use a planer, or by hand with a G-Rasp and then a hard sanding block.
To begin shaping your bottom band, place the blank bottom-up on your shaping racks with your shaping weight near the center of the board. Start shaving with the Rail Runner or shaping tool of your choice with light pressure where you want the hard edge to begin tapering, and work your toward the nose. Use the tool to remove most of the foam down to your bottom rail band marks, then smooth and clean up this band with your hard sanding block. When completed, this bottom band should get wider toward the center of the board, then taper slightly towards the nose of the board. Once again, as you’re shaping this band, step back and take a good look with your eye. This is another good time to utilize your sidelights or fluorescent handheld light. Ideally, the band has a nice smooth curve to it, with no sudden changes in width or angle.
SHAPING THE TOP RAIL BANDS
The top rail bands are substantially larger than the bottom. You can do them by hand with a G-rasp, or power planer. Just like with foiling your board, you can always adjust your planer to a low-depth to minimize potential mistakes while planing your rail bands. There are typically two main deck railbands that you cut before you begin smoothing and rounding the rails. The first cut is the steeper band which is closer to the rail on the deckside, the second band cuts further toward the stringer, but not as deep as the first rail band.
You need to be very careful with the planer as you approach the nose area, as you don’t want to take out a big chunk of nose by accident. It is safer just to plane your railbands with the planer up to about 10" or so away from the nose. You can finish the rail bands in the nose area by hand with a G-rasp and hard sanding block.
Since top rail bands reach their maximum depth toward the center of the board, you will also want to try to adjust the planer depth “on the fly,” keeping it lower in the tail and nose area, and higher in the center. Like everything else in shaping, the key is just to try to have nice, smooth bands with no sudden changes in width or angle. Once you remove the majority of material with the planer, finish off the first rail band with your hard sanding block, trying to have the band meet up with your first rail-band markings. It doesn’t have to be perfect, just try to have the band come out as smooth as possible.
Once the first rail band is cut and smoothed, you plane the second band, using the marks on the deck as your guideline, and intersecting the first rail band at about its mid point. Use the planer to remove most of the material for the second band (except in the nose area), and finish up with the hard sanding block. Use the sanding block to smooth out the second band and get it close to your second band marks on the deck. Don’t worry if you still have pencil/Sharpie marks all over your blank at this point. You will sand them out in the final sanding step.
BLENDING RAILS
At this stage you should have two distinct rail bands carved into your deck, and one on the bottom of your blank. Now you need to use your hard sanding block to “break down” the distinct lines connecting each rail band. Use your hard sanding block with medium grit (60-80) sandpaper to flatten the hard edge between the two top rail bands. You will create two new edges by doing this, but the angles on these new edges are lower and not as sharp. Blending the bands is the continuation of this process until you have a series of very small bands with low-angles, forming a rough curve which represents your final rail shape. The very top rail band should almost invisibly blend into the deck.
You also should continue to have your vertical rail, which represents the original outline of your board. Since you’ve carved out your rail bands, this vertical section is much smaller than it used to be. As you continue breaking down the rail bands with your sanding block, try to make sure you maintain that small vertical band down to about 1/2” width or so. If you sand into this band, you are changing your outline.
You must also blend your bottom rail band into the bottom of the board and the vertical band on the side of the rail. The process is the same as the top, albeit you will only need to take a few passes smoothing out the distinct lines on the bottom as it is a much smaller radius curve than the top. Try to leave a nice, smooth distinct line where your bottom rail curve meets the bottom of the board. This is done by making smooth, long strokes with your sanding block without changing the angle of the block as you are blending the underside rail band into the bottom of the blank. Remember to be careful toward the tail of the board, where you want to maintain that 90 degree sharp edge.
SCREENING RAILS
Once you have broken down all of your rail bands, it’s time to smooth the remaining small bands into a nice, round final rail shape. For this step, most shapers SandShark sanding screen, pulling the screen back and forth over the rails to smooth out the remaining bands into a nice clean curve. Take your time with the sanding screen and don’t pull/push too hard. The screen can remove a lot of material quickly if you are putting too much pressure on it. Start by screening the top side rail, then the bottom side rail. Finally, quickly smooth out the top and bottom at the same time by wrapping the entire rail with the screen to radius the entire rail smoothly. Remember to use a light touch here, as removing material from the former vertical band will change the outline of your board.
HOW TO FINISH SHAPING A SURFBOARD
FINAL SANDING
At this stage, you are in the home stretch of the shaping your board. All that is left to do is do a quick smoothing of the entire shape with a soft sanding pad and medium grit sandpaper (80 grit) or sanding screen. You can screen the board with progressive grits to tighten up the small voids or simple seal the board with sealing spackle at this point if shaping EPS foam (see below). Start with 100 grit and progress to 150 and 220 for a really smooth board that will look great under a tinted lamination.
When final sanding, use a surfboard shaping foam sanding pad and hold the sandpaper or screen under the pad by folding one corner of the pad up and grasping the screen with your fingers on one hand while the other hand presses down on the pad and screen to sand. Holding the leading edge of the pad up will stop the screen from rolling over and scratching your board. Keep the pressure light, as you don’t want to remove much foam at this stage. You just want to smooth everything out and get rid of any rough spots.
This is also a good time to sand away any pencil/Sharpie marks that are still on the blank. Just be sure to sand lightly to avoid making dents in the blank. Now is also a good time to check your stringer one more time and plane high spots flush to the foam with a spoke shave.
Sealing the Blank (Optional)
Sealing the EPS blank is optional but we recommend it to make your board look great while eliminating a lot of fine sanding and screening. This smoothes out any holes, provides a nice white surface for artwork, and seals up the pores of the blank so it doesn’t absorb too much resin when you are glassing. Our Engineered EPS doesn’t need to be sealed as it will not have as much bead tear out as other EPS foams, but if you want a clean looking white board, painting the blank, or tinting the resin, here’s how:
Use a bag of our EPS Surfboard Sealing Spackle (one bag will seal a board up to ~7'0" long). It is bright white and light, so is the preferred spackle for sealing EPS blanks. Scoop a hunk of spackle into a mixing cup, and add a little bit of bottled or distilled water (NOT TAP WATER - the minerals in tap water will turn the spackle yellow) to the mix to turn the spackle into a whipped cream consistency.
Pour this water/spackle mixture over your blank and spread it around smoothly and thinly over the surface of your blank with an epoxy spreader. Scrape off the excess spackle back into your mixing bucket, as you can re-use it for the other side of your board. If you have any small dings or chunks missing from the blank (common in the stringer area), you can fill these holes with the spackle.
The idea is to just fill the small voids in the foam and not put a thick later on the board. Scraping the spackle off with the epoxy spreader will take all the excess off and leave just what is needed in the holes.
You can apply the spackle to the rails with your hands and just glob it on since your hand can conform to the rail shape easily. Then follow with the epoxy spreader to clean it up.
Allow the spackle to dry, flip the blank over, and repeat the process on the other side. Just add a bit more water to your old spackle mix and it should be ready to go again. Once the spackle is dry, you can lightly sand the entire blank with a soft sanding pad and 220 grit sanding screen or sandpaper.
HOW TO INSTALL SURFBOARD FIN BOXES
If you choose to install FCS Fusion, FCS2, or Futures fin boxes now is the time... before fiberglassing. These three fin systems are called "pre-glass" and installation requires a trim router and install jig designed specifically for each fin system. You also have the choice to use FCS X-2 plugs or FACTORY plugs and install them after glassing the surfboard is done.
Fin installation starts with laying out where the fins will go before routing the pockets. Greenlight's G-square layout tools do the work for you to ensure proper fin alignment and toe in angles.
Click to download Greenlight's Surfboard Fin Position Layout Guide for tri-fin, quad, and 2+1 fin setups
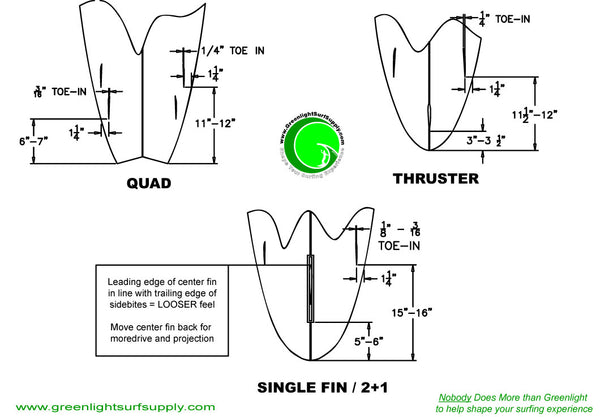
Fin placement is always measured from the tip of the surfboard's tail and a certain distance "in from the rail" as shown in the fin placement guide.
There is a lot of detailed installation instructions for each fin system and how to videos on the product page links below:
How to Install FCS Fusion Fin Boxes
How to Install FCS II Fin Boxes
How to Install Futures Fin Boxes
*Glass-on fins are attached to the surfboard after the fiberglass lamination is complete, but before the hotcoat.
Download Greenlight's Glass-on Fin Cant template here
HOW TO ADD COLOR AND ARTWORK TO A FOAM BLANK BEFORE GLASSING
INTRODUCTION
Before you glass your board, you have the option of preparing a few cosmetic touches to your blank. This is the stage where you would airbrush or paint the foam blank and it is also the stage you would design and print any logos that you want to laminate under the fiberglass.
AIRBRUSHING OR SPRAY PAINTING THE BLANK
We are not going to give detailed advice on airbrushing or painting your blank, since it is primarily a creative process. However, there are a few things you need to know if you are going to airbrush or paint your blank. For airbrushing, you should use water-based tempera surfboard paint. You will also need an airbrush and compressor. If you plan on spray-painting your blank with a rattle-can, you must also use water-based spray-paint, especially on EPS blanks. Regular spray-paint contains styrene, which will literally melt your EPS blank. Water-based poster paint has proven to be the best for surfboards for durability and to ensure a good bond between the blank and the fiberglass/resin.
There are some great airbrushing videos on YouTube and also a great airbrushing DVD in JC’s 101 DVD Series if you want to get a detailed look on ideas and details for airbrushing your blank.
PRINTING LOGO LAMINATES
If you would like to put some logos under your laminate, you can design them on your computer and print them out using Greenlight’s Logo Printer Paper. Once you have designed your logo, set your ink-jet printer to print on medium resolution. You need to tape the Logo Printer Paper to a regular sheet of paper, and manually feed this paper into your printer. Make sure the logo paper is facing the proper direction to receive the ink jet ink.
Once the logos are printed, remove the logo paper from the backing paper and cut the artwork/logo out leaving a small margin around the design. You should print as many logos as you can on each piece of logo paper, since you can only send it through the printer once. Details on laminating the logo into your glass-job will come up in the Glassing section of this guide.